
: Select this option to create a new profile. After choosing this option an input form will be displayed:
Profile name: Enter the name of the profile. The maximum length of the profile name is 30 characters. A profile name cannot exist of only punctuation characters.
Comments: Enter a description for each language. This comment can have a maximum length of 100 characters.
File to select from: Select the file to select the data elements from for this profile.
Maximum number of errors: Specify the number of errors, which will cause the execution of the profile to be halted if it is exceeded.
After you have submitted the form, the system takes you to the detail screen of the global change profile:

: To create a new rule, the system uses a wizard that will guide you through the rule creation process. See paragraph 631.2.2 for more details about this wizard.
: If you select a rule, the system shows you the parameters that are attached to the rule. You cannot change the rule type. If you want to change the rule type, you have to delete the rule and add a new rule with a different type. If you want to change / view the restrictions for the rule, you have to use the button.
: The system will ask you for a confirmation. If you confirm, the rule will be deleted and the rule numbers will be recreated.
: You can modify the general properties of the profile as described for the same option mentioned in paragraph 631.2 above.
: To move a rule in the list, follow these steps:
1. Select the rule that you want to move to another position in the list.
2. Click on the button.
3. The system displays a form that allows you to indicate to what rule id you want to move the selected rule id. The selected rule will be moved to the position that you indicate and the rule numbers will be recreated.
: Select a rule and then this option to view/modify the defined restrictions or add new restrictions. See paragraph 631.2.3 for more information.
: Select one or more rules from the 'general' group and click this button to add them to a (new) group. See paragraph 631.2.4 for more details.
: Select one or more rules from a group and select this option to put the selected rules back in the 'general' group and the rule numbers will be recreated.
If a group does not contain rules when the user leaves the rules overview screen the group is deleted automatically and the group numbers will be recreated.
: Select any rule from group and select this option to change the properties of the group.
: Select a rule and then this option to copy the restrictions form this rule to another. The system will present a list of rules to copy to.
: To create a new rule, the system uses a wizard that will guide you through the rule creation process.
To create a new rule, the system uses a wizard that will guide you through the rule creation process. This process consists of a number of steps; the actual number of steps depends on the rule type (in almost all cases there are two steps).
Note
All forms of the Wizard process have the following buttons (if appropriate): , and . The first form does not have the button. The last form does not have a button but a button. If the button is activated, the process is terminated. The system will ask for a confirmation.
Select the appropriate rule type from the list of available types.

Depending on the selection step 2 will offer different options.
Select to which data element the rule has to be applied and which data string has to be replaced by which other one.
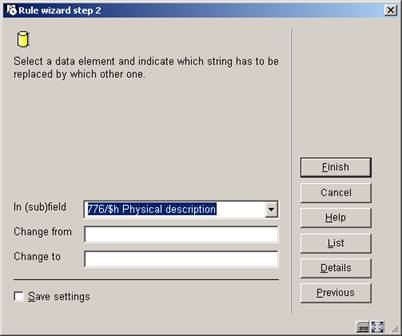
The button "" allows the user to select a valid option from data elements, which point to an authority list. The button "" allows the user to see details about a data element.
You can use the Replace type to remove parts of data from a field and to append data at the end or at the beginning of a field. The following table explains these specifics.
|
From |
To |
Explanation |
Example of change (input is ABCA) |
|
A |
B |
String A will be replaced by string B |
BBCB |
|
A@ |
B@ |
String A will be replaced by string B if the string begins with A |
BBCA |
|
@A |
@B |
String A will be replaced by string B if the string ends with A |
ABCB |
|
@ |
A@ |
Append the string A at the beginning of the string |
AABCA |
|
@ |
@A |
Append the string A at the end of the string |
ABCAA |
|
A |
|
Replace the string A with nothing |
BC |
|
A@ |
|
Replace the string A at the beginning of the string with nothing |
BCA |
|
@A |
|
Replace the string A at the end of the string with nothing |
ABC |
|
\@ |
* |
Replace the character “@” by a star; if the “@” (add-sign) character is preceded by a “\” (backslash), the system no longer interprets it as the truncation character, but as a regular character |
ABCA [no change as the string does not contain the @ character] |
|
* |
\@ |
Replace the character “*” by an add-sign; if the “@” (add-sign) character is preceded by a “\” (backslash), the system no longer interprets it as the truncation character, but as a regular character |
ABCA [no change as the string does not contain the * character] |
Both “From” and “To” data strings cannot contain more than one add-sign.
The @ character (add-sign) is used as the truncation character. If one wants to “global change” the add-sign as a character (and not as the truncation indicator), it should be preceded by the backslash (\).
Note
All examples in the previous table are case sensitive.
Select to which data element the rule has to be applied and which transformations must be applied, and in which order they must be applied.

The button "" allows the user to see details about a data element.
The following transformations can be used:
· all to uppercase
· all to lowercase
· first character uppercase
· each word - first character uppercase
· remove all but numeric characters
· remove all punctuation
· translate all punctuation to (nothing)
· translate all punctuation to . (a dot)
· translate all punctuation to – ( a dash)
· translate all punctuation to blanks
· remove all blanks
· remove articles
· remove all stop words
The list of valid transformations is identical to the list that is available in AFO 482 and 469.
Select the (sub)field that has to be copied and the (sub)field to which it should be copied.

The button "" allows the user to see details about a data element.
Both data elements (“from” and “to”) have to be of the same type, i.e. both have to be either fields or subfields. The “From” and “To” data elements cannot be the same data element.
Select to which data element the rule has to be applied by selecting the (sub)field that has to move and the (sub)field to which it should be moved.
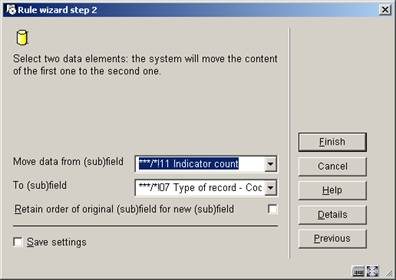
The button "" allows the user to see details about a data element.
Both data elements (“from” and “to”) have to be of the same type, i.e. both have to be either fields or subfields. The “From” and “To” data elements cannot be the same data element.
Select the two fields of which the content has to be flipped.
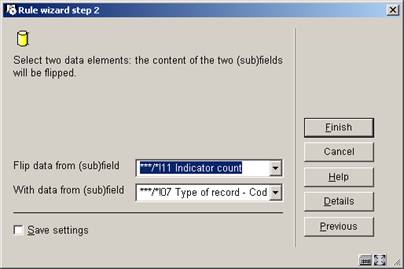
The button "" allows the user to see details about a data element.
Both data elements (“from” and “to”) have to be of the same type, i.e. both have to be either fields or subfields. The “From” and “To” data elements cannot be the same data element.
Select to which data element the rule has to be applied. The (sub)field will be removed from the record.

The button "" allows the user to see details about a data element.
Select a data element and define a data string. The (sub)field will be created and will contain the defined data string.
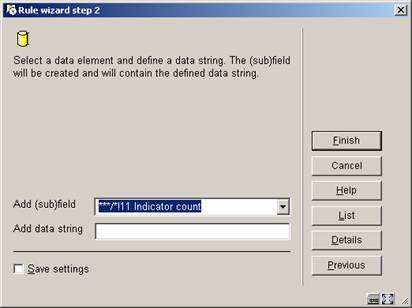
The button "" allows the user to select a valid option from data elements, which point to an authority list and. The button "" allows the user to see details about a data element.
Select the data element to change the order of within the record.

The button "" allows the user to see details about a data element.
This is the only option that offers a step 3 for the wizard:
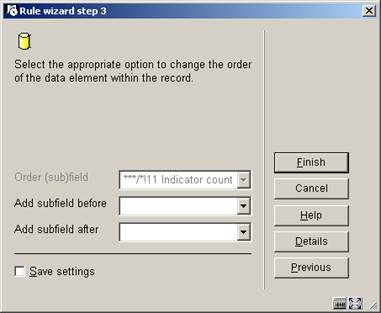
Select the action appropriate for the selected data element to specify how the order of the data element should be changed within the record.
If the selected data element is a field, there will be:
· a dropdown list containing all fields from the format and the extra option 'the start of the record" ["Add field before"]
· a dropdown list containing all fields from the format and the extra option 'the end of the record" ["Add field after"]
If the selected data element is a subfield, there will be:
· a dropdown list containing all subfields of the field specified in the selected data element and the extra option 'the start of the record" ["Add subfield before"]
· a dropdown list containing all subfields of the field specified in the selected data element and the extra option 'the end of the record" ["Add subfield after"]
: If you activate the view restrictions for a rule button, the system navigates to the restriction overview screen.
The restriction overview screen is largely identical to the SSP selection profile screen as used in AFO 141->selections.
Above the list of defined restrictions for the selected rule the system shows the Boolean relationship between the restrictions. For each restriction the following data is shown: criteria, operator, data type, variable, value and exact value.

: Choose the option to create new criteria. See section 631.2.3.1.
: Select a criterion and then this option to modify it. The same form as for new criteria is presented. See section 631.2.3.1.
:Select a criterion and then this option to delete it.
Note
Deleting a restriction can make the Boolean expression invalid. If this is the case, the system will show a warning and remove the Boolean expression. You will have to redefine a correct expression.
: This option is only relevant in AFO 141 and therefor not active here.
: This option is only relevant in AFO 141 and therefor not active here.
: This option is only relevant in AFO 141 and therefor not active here.
: This option is only relevant in AFO 141 and therefor not active here.
: If you do not add a Boolean relation to the profile, the system will automatically assume the Boolean relation to be “AND”. With this option you can set another Boolean relationship. See section 631.2.3.2.
: The system will show a form where you can specify the new (line) number of the selected restriction. After pressing the system will insert the restriction at the specified number. Any existing restriction with that number and all restrictions coming after the specified number will be automatically moved one number down.
: This option is only relevant in AFO 141 and therefor not active here.
: This option is only relevant in AFO 141 and therefor not active here.
: This option is only relevant in AFO 141 and therefor not active here.
: Choose the option to create new criteria. An input form is shown:
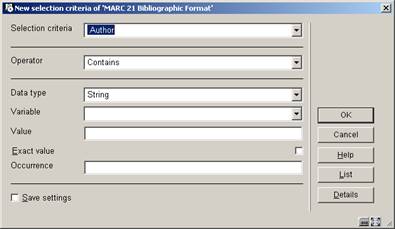
Selection criteria: Select a criterion from the list.
Operator: Select an operator from the list of available operators.
Data type: Select “String” or “Variable”.
Variable: Select a variable from the list of available variables.
Value: Type in a value. This can be any string.
Exact value: Indicate whether or not the Value has to be interpreted “exactly” (i.e. without any transformation) or “normalised” (i.e. transformed to uppercase).
The relationship between Variable and Value
If the Data Type “Variable” is selected, you can define both Variable and Value to achieve specific results. If you start Value with a plus (+) or a minus (-) sign, followed by a number, the system will add (+) or deduct (-) the number from the value of the Variable.
Example
If you define Variable as “Today” and Value as “+1”, the system will select the date of Today+1, which is tomorrow; if you define Variable as “1st January of Current Year” and Value as “-1”, the system will select the first day of the current year -1, which is the last day of the previous year.
: If you do not add a Boolean relation to the profile, the system will automatically assume the Boolean relation to be “AND”. You can change the Boolean relation by using one of the following syntaxes.
|
Syntax |
Boolean relation |
|
AND |
Boolean AND |
|
OR |
Boolean OR |
|
NOT |
Boolean NOT |
|
Complex |
See following section |
“Complex” Boolean relations are expressed using the AND, NOT and OR operators and digits that refer to the restrictions in the profile.
Note
The evaluation of the string is pure left to right evaluation and that brackets should be used for nesting. Blanks will be automatically removed from the Boolean expression. The Boolean operators are not case-sensitive.
Some examples
|
Example |
Comments |
Identical to |
|
1 OR 2 |
Criteria 1 OR Criteria 2 |
OR 1OR2 (1OR2) (1 OR 2) 1or2 |
|
(1 OR 2) AND 3 |
(Criteria 1 OR Criteria 2) AND Criteria 3 |
((1 OR 2) AND 3) (1OR2)AND3 (1 or 2) and 3 1 OR 2 AND 3 [Because the evaluation is pure left to right, brackets can be omitted in this case.] |
|
(1 NOT 3) OR 2 |
(Criteria 1 NOT Criteria 3) OR Criteria 2 |
1 NOT 3 OR 2 [Because the evaluation is pure left to right, brackets can be omitted in this case.] |
|
(1 OR 2) NOT (3 AND 4) |
(Criteria 1 OR Criteria 2) NOT (Criteria 3 AND Criteria 4) |
|
Not that the Boolean expression cannot start with a Boolean operator. The following expressions are invalid:
· NOT (1 AND 2)
· NOT 3 OR 4
If you do not include all criteria in the Boolean expression, the ones that are not in the expression are automatically added to the expression with an AND relation.
Example
If a profile contains three restriction criteria and a Boolean expression “2 or 3” the system will automatically add the first criteria to the expression, which results in “2 or 3 and 1”. However, we advise you to include all criteria in the Boolean expression to avoid confusion.
: Select one or more rules from the 'general' group and click this button to add them to a (new) group. An input form will be displayed:

You can either select a group from the dropdown list or define a new group by entering data in the Comments field.
After choosing this option an overview screen is displayed:

This option gives access to all options of save list management as if you selected through AFO 141->Save lists.
See the help on AFO 141 for more information about this screen and its options.
Activating a global change process is a multi step process. The initial step of this process determines all following steps.
After selecting this option an input form is displayed:

Report comments (optional): Type in comments for the report. The comments cannot consist of only punctuation characters and has a maximum length of 3000 characters. The comments can be used to better identify global change processes.
Save list: Select the save list that you want to apply the global change profile to.
Profile: Select the global change profile that you want to use.
Mode: Select in which “mode” you want to run the process. This is either “dummy" mode, “with confirmation" mode or “without confirmation" mode. Dummy mode implies that the system runs the process as a “dummy” process; no changes are made to the actual data files. With confirmation mode implies that the system will ask a confirmation for each record: each record will be displayed (with a “before” and “after” version of the record) and you have to confirm each change. Only if you confirm the change will it be applied to the actual data. Without confirmation mode implies that the process changes the actual data without asking for individual confirmations.
The further process, after you have clicked , depends on the run mode that you have selected.
The system switches to the general procedure for starting processes. You can now start the process in online, batch or memory mode.
The system shows a warning: “You are going to modify the records in save list XXX. This save list contains YYY records. Cancel this process if you have not tested it by running it in dummy mode or if you have not checked the result reports of the dummy conversion. Have you tested this process in dummy mode?”
The system shows an additional warning if the selected profile has not been used in "dummy" mode before which strongly advises the user to test the profile first using "dummy" mode.
The system switches to the general procedure for starting processes. You can now start the process in online, batch or memory mode.
For each record in the save list the system shows the following form. Confirm if the system has to apply the change to the actual data, or Cancel if no change has to be made.
For each record in the save list the system shows a confirmation form.
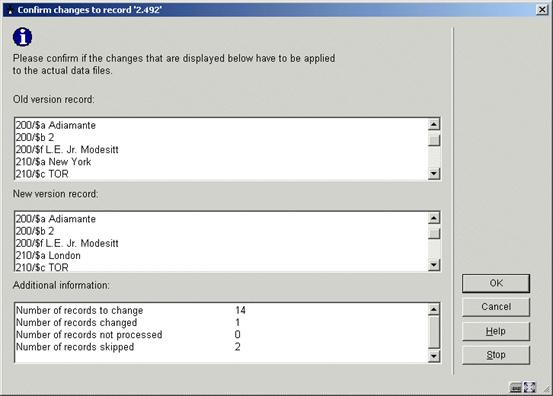
This confirmation form allows you to see the record before any change is done and the record as changed by the profile and allows you to confirm those changes or not and to stop processing the save list entirely.
None of these fields can be modified.
The form contains the following buttons:
· : the change is applied to the actual data
· : the system skips the record (the change is not applied to the actual data) and moves to the next record in the save list
· : stop the whole process
Note
Records in the save list are skipped automatically if none of the rules apply.
At the end of the process (this is either if the end of the save list is reached or if the process is stopped by the user), the system displays the summary Totals.
If the system encounters a software problem during the global change process it should:
· return the record to the state before processing of the record was started (not necessary if the process was started in "Dummy" mode)
· log the record in the appropriate error category of the report of the global change task
· continue with processing the next record from the save list.
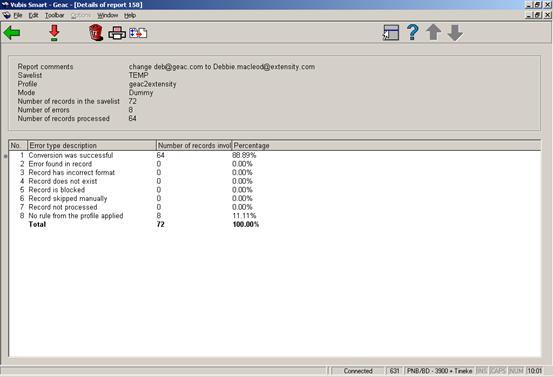
The system displays the reports of all global change tasks that have been processed by the system, in reverse chronological order (i.e. the most recent one is at the top of the list):
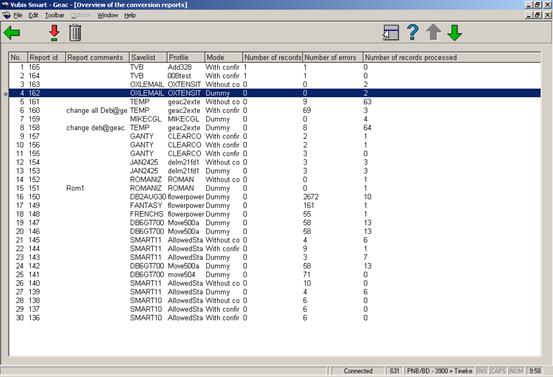
Report id: This is a number that is automatically handed out by the system.
Report comments: The description given to the report.
Save list: The savelist against which the process task was performed.
Profile: The profile used to perform the task.
Mode: The global change mode used.
Number of records in the save list.
Number of errors: This can be higher than the number of records in the save list as the same error can appear multiple times in the same record.
Number of records processed: This can be lower than the number of records in the save list if the conversion is run in "With confirmation" mode and if the process is terminated by the user before the end of the save list is reached.
If the execution of the task was halted due to the fact that there were too many errors reported by the task the system will show a warning icon in front of the task.
: Select a report and then this option to view the details. See section 631.5.1 for more details about this screen.
: Select a report and then this option to delete it. The system asks for a confirmation.
The system displays a select list that contains an overview of all error types that appear in the report. At the top of the screen the system displays (in a bordered window) the same data elements that are shown on the overview screen of reports: task wording, save list, profile, global change mode, number of records in the save list, number of errors, number of records processed).
The select list displays the error type description, the number of records involved and the percentage in relation to the total number of records in the save list. [Please note that the total can be higher than 100% as the same record can be attached to multiple error types.]
The error types that are shown depend on the file type (application) that was processed (bibliographic, authority or borrower). On top of these file specific errors, the system shows the following information in the report:
· Conversion was successful
· Error encountered in record
·
Record has incorrect format
[as in not the same format as the profile uses; only for authorities and bibliographic records]
· Record does not exist
· Record is blocked
·
Records skipped manually
[if a process is run in "With confirmation" mode]
·
Records not processed
[if a process in "With confirmation" mode is cancelled]
· No rule from the profile applied
The total is mentioned at the bottom of the error list.
: If you select an error type, the system displays a select list that contains the records that are attached to the selected error type. See section 631.5.1.1 for more details.
: Select a report and then this option to delete it. The system asks for a confirmation.
: The system switches to the standard dialog for generating output.
: The system asks in which save list the records have to be stored. This can be an existing save list, but you can also create a new save list.
: If you select an error type, the system displays a select list that contains the records that are attached to the selected error type.
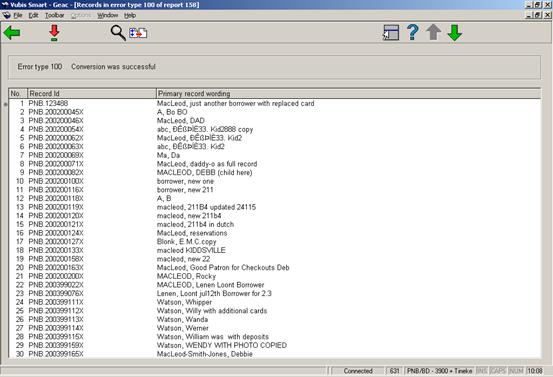
Multiple detail lines can exist for a single record as the same error can occur multiple times in the same record.
: The old and new version of the record will be displayed in a pop-up screen.
to get access to the regular record overview screen (of bibliographic, authority or borrower maintenance, i.e. AFO 111, 113 or 431)
: to store the records in a save list
· Document control - Change History
|
Version |
Date |
Change description |
Author |
|
1.0 |
unknown |
Creation Delivered as part of build 17 set |
|